Photographs are just about the cheapest souvenirs you can get, so it’s no surprise that even travelers who aren’t serious photography buffs get snap happy on the road. In the good old days, my mantra used to be "film is cheap," and I’d go through 25 or more rolls of film in a two-week trip. Nowadays, digital cameras make it even easier to capture thousands of images during a vacation – but how many of them are photos you’d actually be proud to enlarge and hang in your house?
Not everyone is going to get prize-winning photographs, but anyone can learn to take better pictures than they currently do. These are just a few quick travel photography tips that will help your photos go from so-so to spectacular. Master even one of them and you’ll see a big difference in your travel photos.
[social]
1. Framing is important
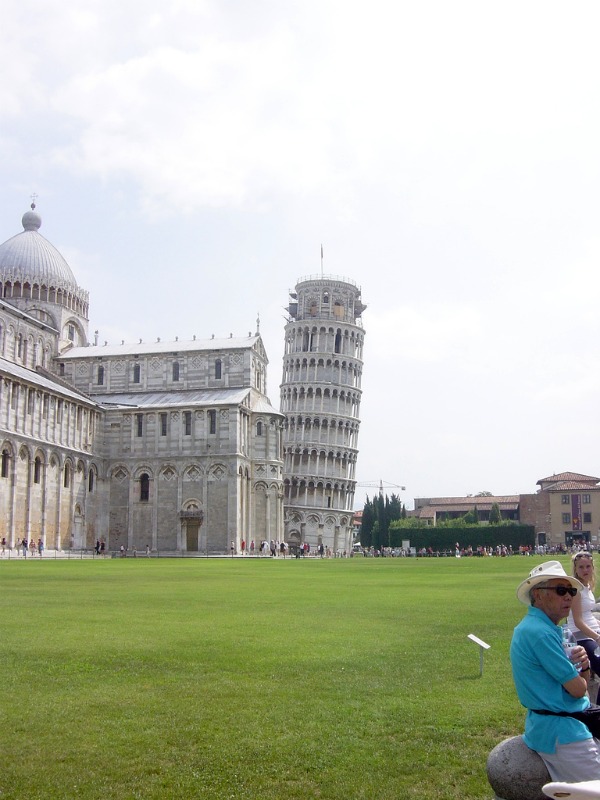
We all know that the subject of this photo is the Leaning Tower of Pisa, so it shouldn’t take up such a tiny portion of the frame. If your camera doesn’t have a zoom lens that will allow you to fill the frame with the Tower, use the free zoom lens that came with your body – your feet. (photo by Julie, Dave & Family)
This is perhaps the most important thing to think about when you’re taking pictures, whether it’s with a big expensive SLR or even a disposable camera – you’ve got to pay attention to the framing. What does that mean? It means that getting a good shot, something that’s pleasing to look at, is about more than just making sure your subject is in the photo.
For instance, let’s say you’re getting a picture of your kids in their Mickey hats on your trip to Disneyworld. You want the photo to be of your kids in their Mickey hats, not your kids as little dots in the middle of the picture with a whole bunch of extraneous action going on around them. Get in close to your subject and make it fill the frame.
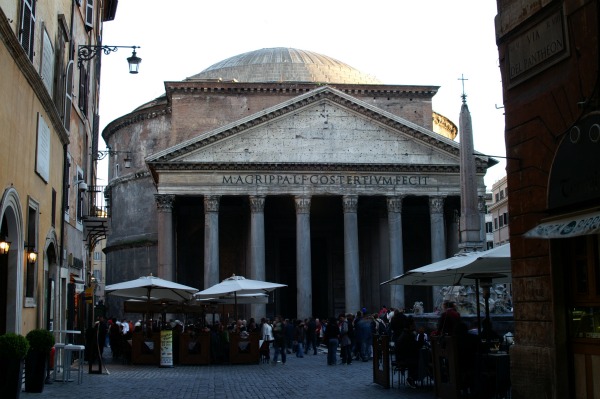
This isn’t the best or most interesting picture of the Pantheon, but at least the Pantheon itself fills the frame so that you aren’t distracted by other stuff going on in the picture. (photo by Jessica Spiegel and may not be used without permission)
On the other hand, if your subject is the Eiffel Tower, you’ll need to get further away from it – but again, fill the frame with the tower so that you’ve got as little "extra" sky and ground as possible. In a way, you’re directing the viewer’s eye when you do this by pointing a big, red, neon arrow over just what you want them to look at – this way they don’t get distracted by all the extra stuff.
Keep in mind that as a photographer, you’re creating a world within the confines of your lens – you determine what everyone else will see when they look at your pictures later, and if there’s something ugly just outside the frame, they’ll never know. You’ve created a new reality, just by paying attention to what you’re seeing through your viewfinder. It’s an awesome power – use it wisely. (J.S.)
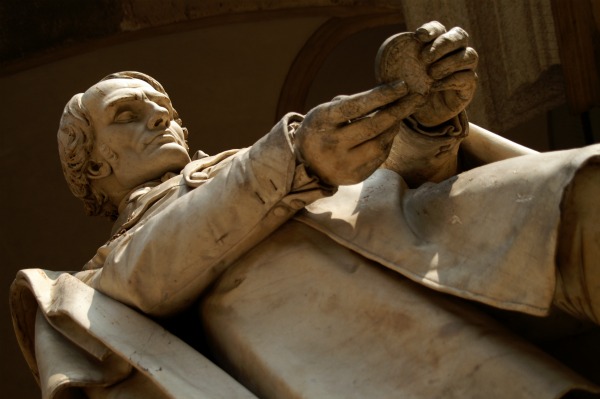
Try this on for size – instead of taking a picture of something vertical holding your camera in the portrait position, get up close and personal with the subject in a horizontal fashion but at an angle. It fills the frame, and it has the added bonus of adding an angular dimension to your picture (see "Capturing Triangles" below). (photo by Jessica Spiegel and may not be used without permission)
2. Learn the rule of thirds
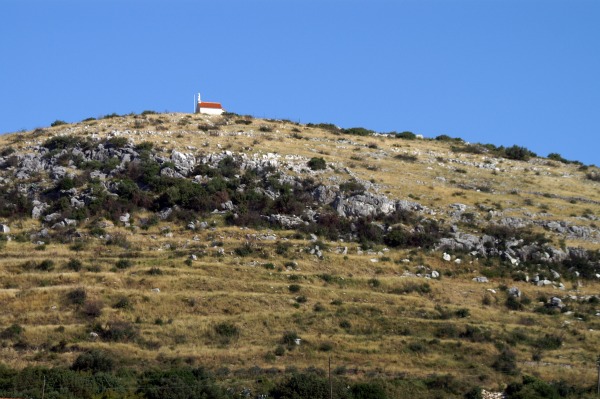
In this shot, the blue sky makes up roughly the top third of the picture, and although it’s not the most interesting shot it’s more intriguing than if the horizon line were dead center. This picture emphasizes the hill that tiny church is sitting on by giving it two-thirds of the frame, which demonstrates to the viewer that there’s really nothing else on that hill – except that tiny church. (photo by Jessica Spiegel and may not be used without permission)
This is kind of a sub-heading of "Framing," but it’s important enough to merit its own bold title. In photography, the "rule of thirds" refers to the fact that the most eye-pleasing compositions for photos split the field into roughly equal thirds (no matter how you’re holding the camera). Some viewfinders will help you see these thirds with gridlines, but most of the time you’ve just got to use your best judgment.
The idea here is that you want the main focal point, whatever it is, to be roughly one third of the way from either the top, the bottom or one of the sides of your picture. And if your focal point is kind of at one of the intersections of the grid (let’s say both one-third from the bottom and one-third from the right), that can be even better. So, if you’re taking a picture of a sunset, for instance, you usually don’t want to make the horizon line dead center. Make it either one-third from the top of the frame or one-third from the bottom. Better yet, do it both ways so you can pick which one you like later (ahh, the beauty of digital!).

The Rule of Thirds works for people, too. Notice how the bride’s eyes are close to one-third from both the top and the left sides of the frame – she is the focus, after all – and the two women on the right are close to one-third from the right. In this case, what’s dead-center (the bureau in the background) is not only not highlighted, it’s completely unimportant. (photo by Jessica Spiegel and may not be used without permission)
This also works when you’re taking pictures of things that aren’t straight lines, of course. Instead of putting your wife’s face right smack dab in the middle of the picture when you’re taking her portrait at Angkor Wat, frame the picture so her eyes mark the invisible line that is one-third from the top of the shot. It’s all about the focal point – which is your wife’s eyes, not the sky two feet above her head. Unless you’re trying to tell her something. (J.S.)
3. Seek out the Golden Hour
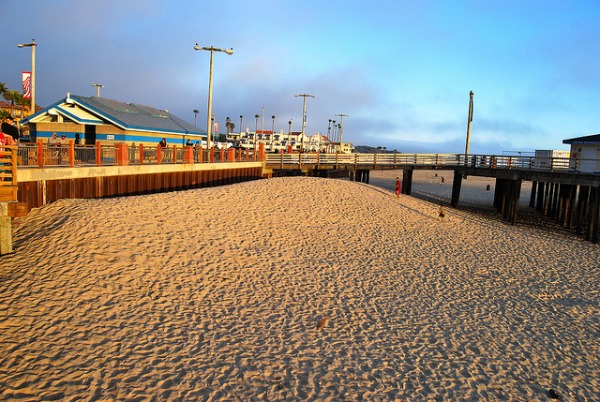
photo by ecastro
Photographers sometimes refer to the first and last hour of daylight as the ‘golden hour,’ which, under the right conditions, can often lead to a soft and warm glow on anything in its path. Taking advantage of this while traveling can be tricky, because our daily schedules are often full and dependent on a host of other factors. But if you wake up early enough, or are paying attention as the sun is about to set, you might be rewarded with some spectacular shots full of interesting colors and hues. Shadows also get long and pronounced during this time, so look for angles that feature these contrasts. If your hotel is near a cathedral or any other interesting building, you might make a point to check out the light early or late for a special quick photo opportunity. (R.W.)
4. Learn to crop people properly
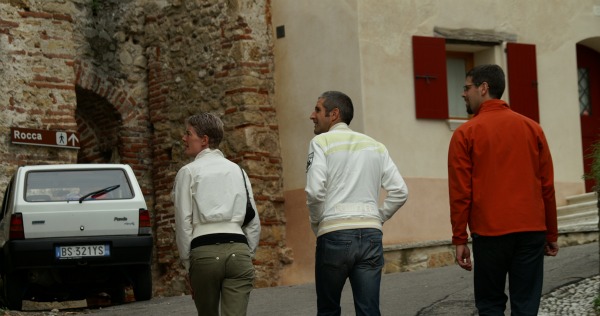
I’ve cropped a photo I took to show you the difference between cropping people at a joint (in this case, at the knees) and cropping them elsewhere. Here, it looks like these three are stumpy and vaguely incomplete. (photo by Jessica Spiegel and may not be used without permission)
Like the Rule of Thirds, this one deals with framing a photo – only this time it’s photos of people. It’s a pretty simple rule, and it’s this: If any of the edges of the photo hits a joint, it’ll make the person look funny. For instance, if you cut them off right at the elbows, or at the knees or ankles, they’ll look odd. Don’t ask me why, it’s just the way it is. Instead, crop them mid-calf, or mid-thigh, or midway between their shoulder and elbow – you get the idea.
This applies no matter how close you are to your subject, too – if it’s a super-close-up of just their head, make sure there’s a little bit of the slope toward the shoulders in the picture, too, or you’ve just made your best friend look like a floating head. And no one likes that. (J.S.)
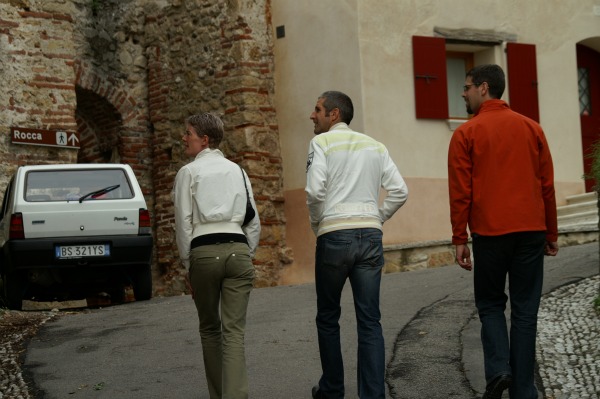
Don’t get me wrong, this isn’t a great picture – it’s a snapshot – but at least these three now look like they’re complete people! (photo by Jessica Spiegel and may not be used without permission)
5. Turn off the flash
Too many people never learn how to operate their cameras beyond turning them on and off, and while I may never figure out what all the buttons and dials on my fancy DSLR do I do know how to do something I think is critical in photography – I know how to turn off the flash. Too often, we look back at our vacation photos and think, "Wow, I thought the evening light was much softer than that…" Well, it probably was, before the flash went off and left everything looking harsh.

This, my friends, is what happens when you try to use the flash on something that is behind glass. The red tint to the photo is another problem entirely, but that’s another article entirely. (photo by Starphysh)
Now, there is a legitimate use for the flash, and in some cases it’s indispensable – but more often than not, there is enough natural light (especially outdoors) for you to get a much better picture by turning the flash off. You may need to practice holding your camera really still if the shutter speed is a little longer, but as long as you don’t have a super-heavy camera you should be able to do pretty well with this.
And please note that turning off the flash is critical when you’re taking a picture through glass. All those photos you take of the Pieta in St. Peter’s Basilica, or the shots you took of the countryside streaming by outside the train window are going to come back with a big white glare in the middle of them if you’re using the flash, and that’s no fun for anybody. (J.S.)
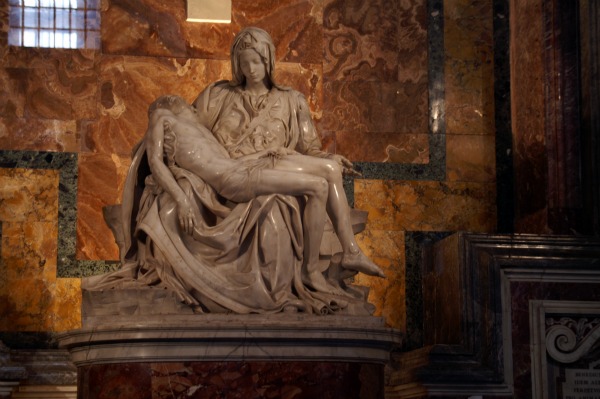
In this picture of that same statue, the flash didn’t fire – and if you didn’t know any better, you wouldn’t even be aware that there was a thick pane of glass between the photographer and the sculpture. Note that you may have to take several pictures to accomplish this, especially at famous sights, because the flash of other people’s cameras could ruin your picture, too. (photo by Jessica Spiegel and may not be used without permission)
6. Shoot mundane things that remind you of something special

photo by Jessica Spiegel and may not be used without permission
Travel photography is about capturing memories as well as places, so don’t hesitate to take shots of simple things that capture part of the spirit or fun of your journey. Especially in the age of cheap digital photography and nearly unlimited memory cards, there is no reason to edit yourself into simply taking photos of town squares and statues. Face it, everyone who goes to Paris has dozens of shots of the Eiffel Tower from every angle in town, which is exactly why these photos are unlikely to be special in your collection. Some people make a point to take shots of interesting meals or weird items they see in markets, and the possibilities are endless if you get creative. These are often the photos we’ll be proudest of when we get back home, and certainly the ones that won’t be found in every other visitor’s collection from that same place. (R.W.)
7. Become your own tripod
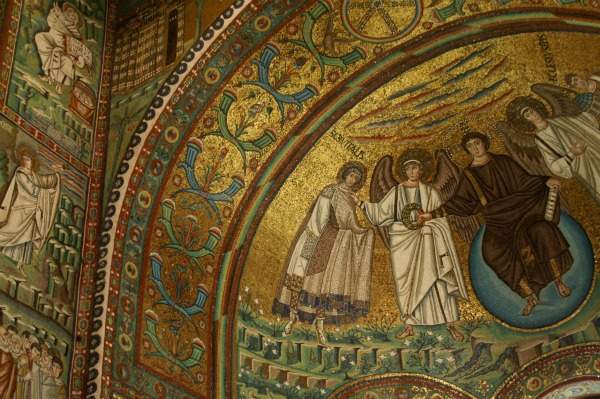
I can’t do anything to convey how dimly lit this church was, except to say that the exposure on this shot was over 1/10 of a second. I had a big stone pillar behind me to keep me still. (photo by Jessica Spiegel and may not be used without permission)
Most of us don’t bring our massive (and heavy) tripods with us when we travel, and those little desktop tripods only work for light-weight point-and-shoot cameras. So if you’re tripod-less and you’re in a low-light situation with no flat surfaces for you to put your camera on to get the shot you want, does that mean you’re stuck trying to remember the scene instead of taking a picture? Not at all. It just means you’ve got to think like a tripod.
You’ve already got two legs, so all you need to do is find that third point, and it has to be something completely stable (because, let’s face it, you’re not). This is easy in places like cathedrals – stone is really stable, and there are walls and columns everywhere. Outdoors, if you can find a statue or lamp post you’re in luck.
All you need to do is lean your back up against your stable third point, and keep your feet apart, and – voila! – instant tripod. This may not work for super-long exposures or super-low light, unless your camera is really lightweight or you can hold your breath for a long time, but it’s definitely worth trying out.
(Keep in mind that although in some places turning on a flash to make up for the low light is fine, there are some churches and museums where flash is not allowed – so you either turn off the flash and learn to be a tripod, or you go without photos. I know which option I prefer.) (J.S.)
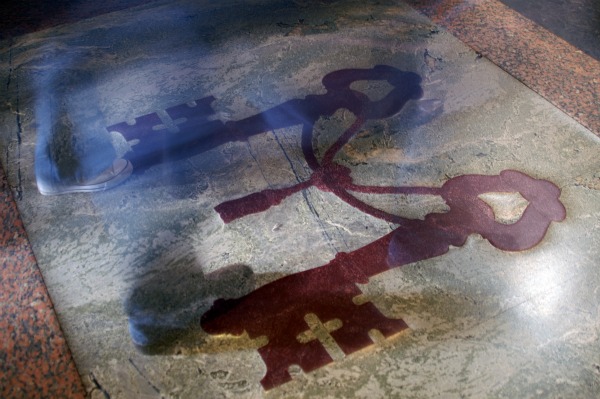
The exposure on this picture was 1.5 seconds – and obviously, the effect that I was going for was to capture the movement of the people walking into the church while the beautiful inlaid marble keys were clear. I tucked myself into the corner of the entryway – which was all solid stone – and that was enough to keep me stable. (photo by Jessica Spiegel and may not be used without permission)
8. Look for reflections in still water
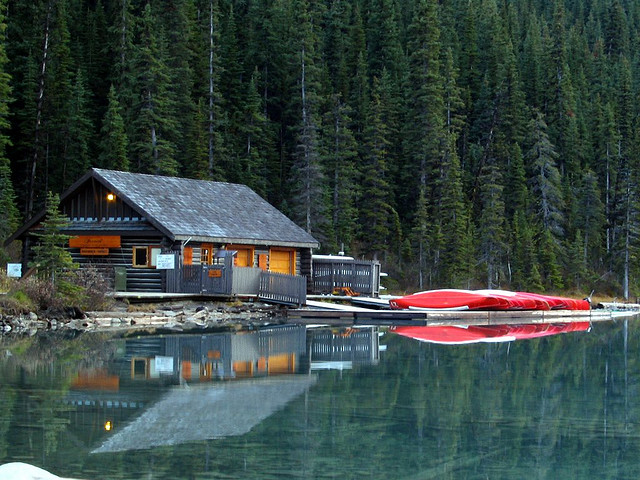
photo by antkriz
This often goes hand in hand with the golden hour trick because conditions tend to be best early or late in the day. You just have to keep your eyes open for this because it’s easy to ignore unless you aren’t specifically after these shots. The fact is, reflections in still (or nearly still) water add a natural special effect to a photograph that always makes them more interesting. Some photographers actually focus more on the reflection rather than the object itself, and there are many artistic ways to compose these shots. The main point is if you are conscious of how a reflection can make an otherwise ordinary photo look appealing and interesting, you’ll be able to capture some good images without any other help. (R.W.)
9. Consider your options when photographing strangers
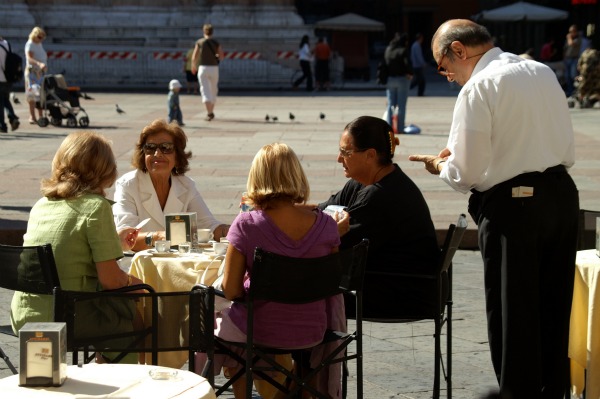
This is one of my favorite pictures from a trip to Italy – not because it’s the best picture, but because I remember sitting in this cafe and watching this group of women chat and gossip with just about everyone who walked by. I snapped several pictures of them while I sipped my own coffee, but they never knew I was there – thanks to my long zoom lens. (photo by Jessica Spiegel and may not be used without permission)
This is actually kind of a controversial topic, because there are two ways you can go about it – and a debate continues to rage in photography circles about what the "ethical" choice is. Basically, you have two choices here – you can either get incredibly bold and march right up to people and snap a photo, or you can invest in a good zoom lens that lets you take photos, stealth-like, from afar.
If you’re going to go the zoom lens route, just position yourself in a way that you’re unobtrusive and the people you’re photographing don’t know you’re there. Then you can zoom in and snap away, capturing the locals behaving naturally because they don’t know you’re there. What you’ll sacrifice with this method is the ability to get really great close-up portrait shots.
So, you’ve decided you want close-up portraits like the ones you see on the covers of National Geographic instead? Then you’ve got to grow a pair and go up and ask people permission to take their photo. It’s as simple – and as hard – as that. For those of you hoping to sell your photos, you’ll need to not only ask permission but also get them to sign something saying it’s okay that you’re making money off their image. (If this is something you’re considering, definitely consult a professional photography resource for more information on what those things should say.)
And one last tip in this department – you’ll need to learn what the culture you’re in thinks of having their picture taken. Some people believe that if you take their photo you’ve stolen part of their soul. And in some places, taking pictures of the women, or the children, or the military or holy men will get you in some serious trouble. So just be sure you know what’s acceptable in the country you’re visiting as far as taking pictures of the locals goes, because we’re not going to come get you out of jail. (J.S.)
10. Capture triangles
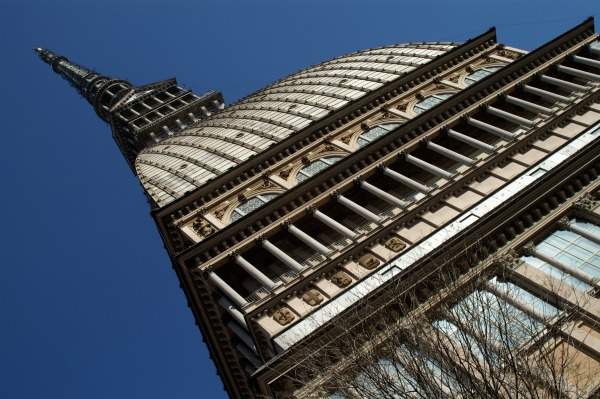
This building is the symbol of the city of Turin, but it’s crammed in next to several other buildings and it’s not very tall – so it’s hard to get a picture of it all by itself without a bunch of other stuff crowding the frame. Unless, of course, you get up close and personal – and put it on a slant. The angle here increases the presence of the building. (photo by Jessica Spiegel and may not be used without permission)
This isn’t about taking pictures of triangles (though, hey, if that’s your thing, more power to you). Rather, it’s about adding the idea of angles and, most specifically, triangles to your pictures. There’s something very pleasing to the eye about angles in a shot – whether it’s a train track leading into the distance, or a branch of a tree that’s angled through part of your photo, or whether it means putting yourself in a different position so that you shoot the building you just shot head-on from an angle that gives it some perspective.
Angles and triangles in your photos help to create a sense of perspective, which puts your viewers in the photo. Instead of being a passive spectator, now they’re in the scene. Which is yet another example of the awesome power those of us behind a camera can have. (J.S.)
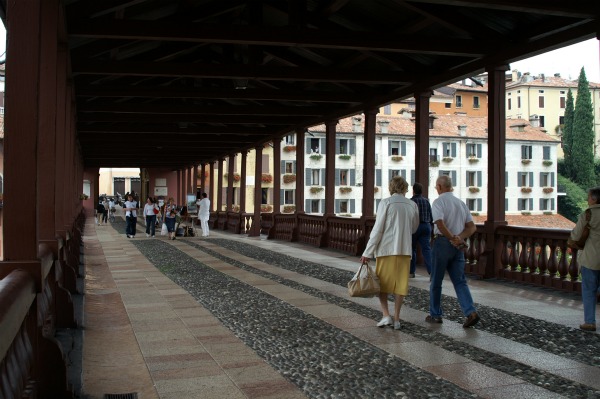
This picture, while nothing particularly special, is made more interesting by being a perspective that’s something other than head-on – while you could stand in the center of the bridge and take a picture, it might not give you the same sense of space that this angle does. (photo by Jessica Spiegel and may not be used without permission)
>> More reading: Writer’s Dilemma: To Take Notes, Experience, Photograph or All of the Above?